How I built this website? - Jekyll and AWS (Part 2)
In previous article, I have shared how to setup Jekyll Blogs on AWS by using S3, Cloudfront and Route53. In this one, we continue to use Github and Github Action for automation build and deploy to AWS. Let’s start…
Start the Jekyll Repo
You need to clone or fork this Jekyll Blog Repo to your Github. You also can follow this tutorial to start Jekyll locally. This repo requires Ruby, Gem and Yarn. Make sure you have installed all that requirements in your local machine.
Start the repo by bellow command:
1
2
3
4
5
# install node package
yarn install

# run the Jekyll server
bundle exec jekyll s
You can modify a little bit in package.json to run the project via yarn command:
1
2
3
4
5
6
7
8
9
10
11

"scripts": {
    "prebuild": "npx rimraf assets/js/dist",
    "build": "NODE_ENV=production npx rollup -c --bundleConfigAsCjs",
    "prewatch": "npx rimraf assets/js/dist",
    "watch": "npx rollup -c --bundleConfigAsCjs -w",
    "test": "npx stylelint _sass/**/*.scss",
    "fixlint": "npm run test -- --fix",
    "dev": "bundle exec jekyll s"
  }
1
2
# start jekyll server
yarn dev
Setting up Permissions for Github Actions
In order for Github to be allowed to push changes to S3 and invalidate the CloudFront cache we need to supply credentials. Back in the AWS console, navigate to the Identity and Access Management (IAM) tool. Create a new user and also create an “Access key” for this user. Save off the access key ID and secret. We’ll need these later.
In IAM when viewing this new user, click on the “Permissions” tab and create a new policy. We need to give this user the ability to place files in the S3 bucket and invalidate the CloudFront distribution. You can use the visual editor or create the JSON directly. I’m going to use Assume Role to give the permission to Github Action. You can take a look at bellow Policy example:
1
2
3
4
5
6
7
8
9
10
11
12
13
14
15
{
  "Version": "2012-10-17",
  "Statement": [
    {
      "Action": [
        "sts:*",
        "sts:TagSession"
      ],
      "Resource": [
        "arn:aws:iam::*:role/github-action-*"
      ],
      "Effect": "Allow"
    }
  ]
}
Navigate to Users and add the Policy we have created above.
Next, we need to create the new Role. Go to the Roles under Access Management and create the new Role with option Custom trust policy
1
2
3
4
5
6
7
8
9
10
11
12
13
14
15
16
17
{
  "Version": "2012-10-17",
  "Statement": [
    {
      "Effect": "Allow",
      "Principal": {
        "AWS": "arn:aws:iam::<account-id>:user/github-action"
      },
      "Action": "sts:AssumeRole",
      "Condition": {
        "StringEquals": {
          "sts:ExternalId": "<your-external-id>"
        }
      }
    }
  ]
}
At the permissions tab, add the AdminstratorAccess policy into your Role.  Add Policy to Role
Configuring Github Actions for Deployment
This should conclude all the changes necessary for AWS. Next, we need to move over to Github and setup the repository.
In your repo, navigate to “Settings”, “Secrets and variables” then “Actions”. Add new secrets named:
AWS_ACCESS_KEY_IDAWS_ACCOUNT_IDAWS_ACCESS_KEY_IDAWS_S3_BUCKET_NAMEAWS_SECRET_ACCESS_KEYAWS_CLOUDFRONT_DISTRIBUTION_IDROLE_EXTERNAL_ID
with their corresponding values.
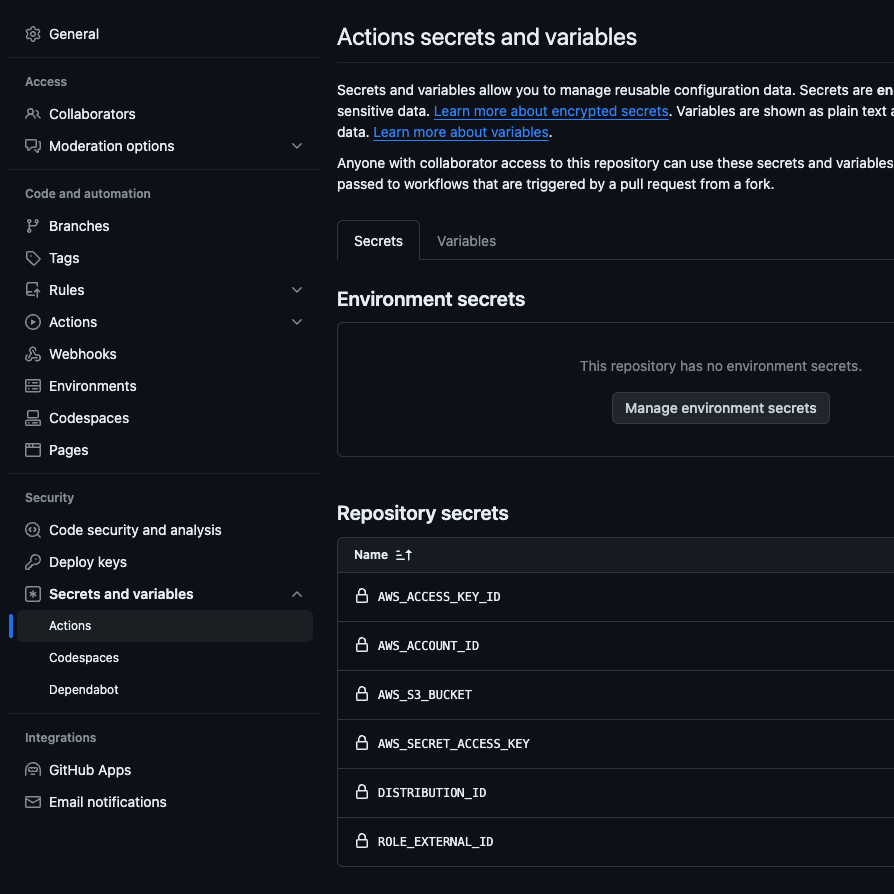 Github Action Secrets
Next, add the following file to the .github/workflows folder in your repository.
1
2
3
4
5
6
7
8
9
10
11
12
13
14
15
16
17
18
19
20
21
22
23
24
25
26
27
28
29
30
31
32
33
34
35
36
37
38
39
40
41
42
43
44
45
46
47
48
49
50
51
52
53
54
55
56
57
58
59
60
# .github/workflows/pages-deploy.yml

name: "Build and Deploy to S3"
on:
  push:
    branches:
      - main
      - master
    paths-ignore:
      - .gitignore
      - README.md
      - LICENSE

  # Allows you to run this workflow manually from the Actions tab
  workflow_dispatch:

permissions:
  contents: read
  pages: write
  id-token: write

jobs:
  build:
    runs-on: ubuntu-latest

    steps:
      - name: Checkout
        uses: actions/checkout@v4
        with:
          fetch-depth: 0

      - name: Setup Ruby
        uses: ruby/setup-ruby@v1
        with:
          ruby-version: 3.2.2
          bundler-cache: true

      - name: Build site
        run: bundle exec jekyll b -d "_site"
        env:
          JEKYLL_ENV: "production"

      - name: Configure AWS credentials from Test account
        uses: aws-actions/configure-aws-credentials@v4
        with:
          role-to-assume: arn:aws:iam::${{ secrets.AWS_ACCOUNT_ID }}:role/<role-name>
          aws-region: us-east-1
          role-external-id: ${{ secrets.ROLE_EXTERNAL_ID }}
          aws-access-key-id: ${{ secrets.AWS_ACCESS_KEY_ID }}
          aws-secret-access-key: ${{ secrets.AWS_SECRET_ACCESS_KEY }}
          role-skip-session-tagging: true

      - name: Copy files to the test website with the AWS CLI
        run: |
          aws s3 sync _site s3://${{ secrets.AWS_S3_BUCKET }} --exact-timestamps --delete

      - name: Clear cache of Cloudfront
        run: |
          aws cloudfront create-invalidation --distribution-id  ${{ secrets.DISTRIBUTION_ID }} --paths "/*"
Now, commit and push the new file to the repository. Under the “Actions” tab in Github you should see this new workflow trigger and attempt to push the site to S3 and invalidate the CloudFront cache. When that completes, visit your custom domain in the browser. If all was successful, you should see your Jekyll static site!
Going forward, any changes you push will automatically trigger the workflow updating the site. If you want more informations, please review my repo
Conclusion
In this tutorial, you configured the Jekyll Blogs and deployed it to AWS. You are now ready to write some amazing articles to share your knowledge. If you have any concerns in this guilde, feel free to ask me. Your comments are my motivation. Thanks!!!
References
Here are a couple other articles that were helpful in getting this setup: