Set up a Kubernetes cluster using k0s
Hello everyone, its new year 2025 and I’m back after a long time! Today, I want to share how to set up a Kubernetes cluster using k0s, which I just learned about a couple of days ago. I’ve been using k0s for a while now, and I’m very happy with it. It’s lightweight, easy to use, and simple to install. In this post, I’ll show you the steps to set up a Kubernetes cluster with k0s.
Prerequisites
You’ll need at least tow VPS for this setup. In this article, I’m going to use 2 VPS. Let’s go step by step
Choose the Master (Control Plane) Node
From your list of VPS, choose one to act as the Master Node (also called the Control Plane Node). It is the brain of a Kubernetes cluster - it’s the collection of components that make global decisions about the cluster and detect/respond to cluster events. Think of it as the command center that ensures your desired state matches the actual state of your cluster. Some of key components of the control plane include:
- kube-apiserver
- etcd
- kube-scheduler
- kube-controller-manager
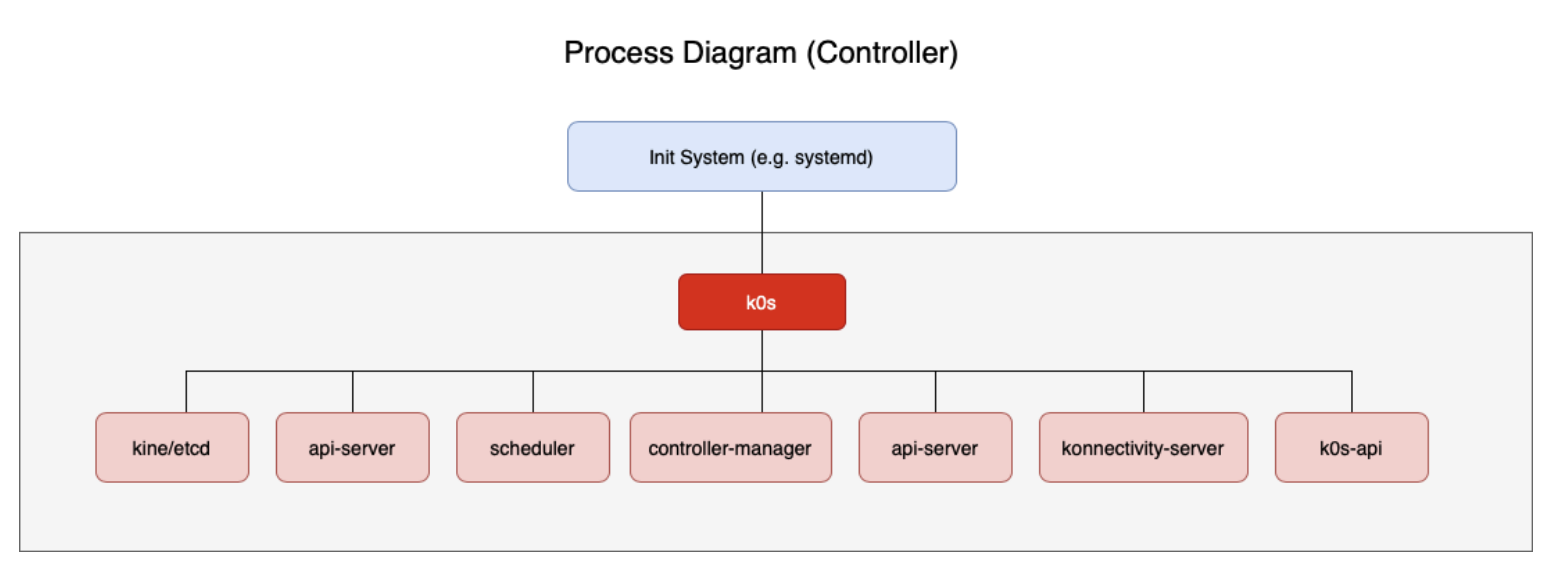 Controller Diagram
Let’s try some commands
1
2
3
4
5
6
7
8
9
10
11
12
13
14
15
16
17
18
19
20
21
22
23
24
25
26
27
28
29
# Update the system
sudo apt update && sudo apt upgrade -y

# Install necessary packages
sudo apt install -y curl wget

# Download the latest version of k0s
curl -sSLf https://get.k0s.sh | sudo sh

# Verify the installation
sudo k0s version

# Create a default configuration file
sudo k0s config create > k0s.yaml

# Install k0s as a service with the controller+worker role
sudo k0s install controller --config k0s.yaml `--enable-worker`

# Start the k0s service
sudo k0s start

# Generate a join token for worker nodes (which we'll use later for other vps)
sudo k0s token create --role=worker > worker_token.txt

# Wait a few minutes for the cluster to initialize, then check the status
sudo k0s status

# Set up kubectl for cluster management
sudo k0s kubectl get nodes
Expected result:
1
2
NAME      STATUS     ROLES           AGE     VERSION
vps-a     Ready      control-plane   2m32s   v1.31.3+k0s
If you do not want your master node as a worker too, you can remove this argument
--enable-worker
Make sure ports 6443 (API server) and 8132 (k0s admin API) are accessible. If you have a firewall enabled, you’ll need to allow these ports:
Set up your Workers
Now that the Master Node is ready, let’s set up the other VPS as the Worker Node
1
2
3
4
5
6
7
8
9
10
11
12
13
14
15
16
17
18
19
20
21
22
23
24
# Update the system
sudo apt update && sudo apt upgrade -y

# Install necessary packages
sudo apt install -y curl wget

# Download and install k0s
curl -sSLf https://get.k0s.sh | sudo sh

# Verify installation
sudo k0s version

# Save the token as a file
# Replace <TOKEN> with the token from Master Node
echo "<TOKEN>" > worker_token.txt

# Install k0s worker with the token
sudo k0s install worker --token-file worker_token.txt

# Start k0s worker
sudo k0s start

# Start k0s worker
sudo k0s start
Verify you result
After finishing the setup, go back to the Master Node and run:
1
sudo k0s kubectl get nodes
The result should be:
1
2
3
NAME      STATUS     ROLES                  AGE     VERSION
vps-a     Ready      control-plane+worker   10m3s   v1.31.3+k0s
vps-b     Ready      worker                 1m52s   v1.31.3+k0s
Access the cluster via external kubectl
If you want to connect to your cluster using your local kubectl command, let’s do some tricks
1
2
3
4
5
# Export your kubeconfig with admin role
sudo k0s kubeconfig admin > ~/.kube/config

# set KUBECONFIG environment variable
export KUBECONFIG=~/.kube/config
Now, you can access to your cluster by using your kubectl command
Conslusion
Setting up a Kubernetes cluster with k0s is simple and lightweight. You just need a Master Node (Control Plane) and one or more Worker Nodes. After installing k0s on each VPS and configuring them step by step, you’ll have a functional Kubernetes cluster. You can even manage it locally using kubectl. k0s makes learning and deploying Kubernetes much easier for beginners. Give it a try, and happy clustering!
References
Here are a couple other articles that you can follow