Using Certbot to generate Let's Encrypt wildcard certificates
In this guide, we’ll explore the process of utilizing Certbot for the creation of Let’s Encrypt wildcard certificates. A wildcard certificate helps to secure numerous subdomains under a single SSL certificate. You may want this one in cases where you need to support multiple subdomains but don’t want to configure them all individually. Let’s Encrypt is an SSL certificate authority that grants free certificates using an automated API.
Prerequisites
To follow this tutorial, you will need:
- A registered domain name. This tutorial will use
jhoangv.com. This domain was purchased from AWS Route53 - Set up Docker and docker-compose on your machine
Seting up your Wildcard DNS
Before we fetch our wildcard SSL certificate, we should make sure our server is responding to requests on multiple subdomains. This will typically be accomplished by setting up a wildcard DNS record, which looks similar to this:
| Record name | Type | Routing Policy | … | Alias | Value/Route traffic to | TTL |
|---|---|---|---|---|---|---|
| *.jhoangv.com | A | Simple | … | No | 102.128.199.10 | 300 |
Running Certbot via docker
Let’s begin with a bellow docker-compose.yml configuration file that defines containers for the certbot:
1
2
3
4
5
6
7
8
9
10
11
12
version: '3'

services:
  certbot:
    container_name: certbot
    image: certbot/certbot
    restart: unless-stopped
    volumes:
      - ./data/certbot/conf:/etc/letsencrypt
      - ./data/certbot/www:/var/www/certbot
    entrypoint: "/bin/sh -c 'trap exit TERM; while :; do certbot renew; sleep 12h & wait $${!}; done;'"
Run the docker-compose
1
docker-compose up -d --force-recreate
When the certbot container started, we need to get inside the container by using this command:
1
docker exec -it certbot sh
Next, you need to run the command that request challange from the Let’s Encrypt
1
certbot certonly --manual --preferred-challenges=dns -d *.jhoangv.com
Then, you need to fill your information. When you see this request, we will go to your DNS provider
 Request Challange
Create a DNS TXT record under the name:
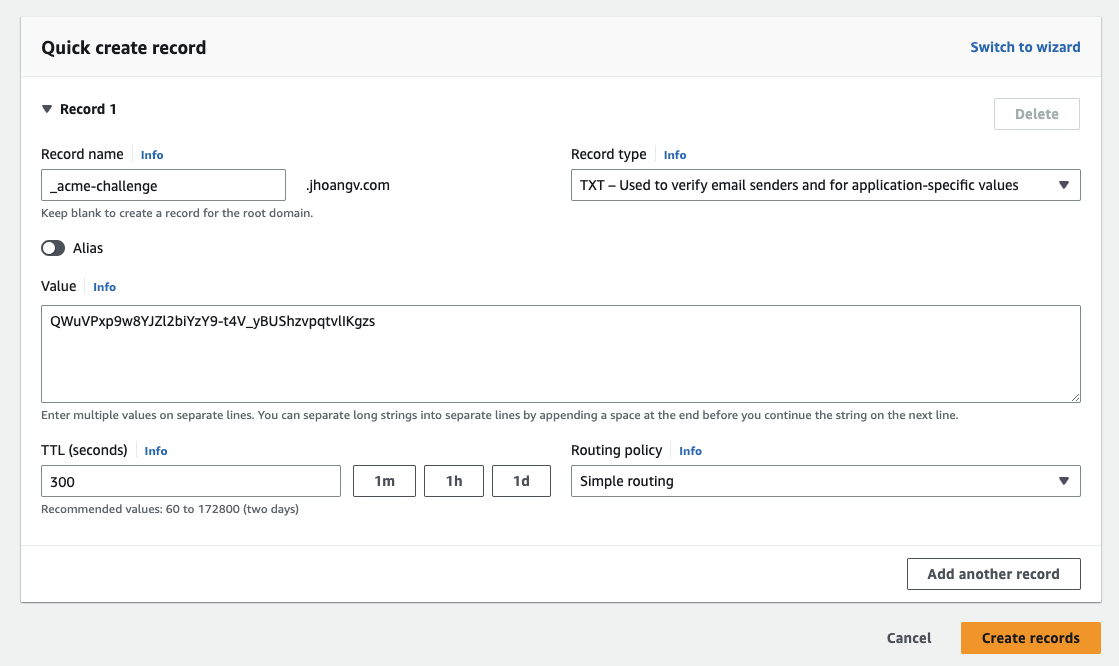 Route53 TXT Record
Click Create records and you will see in Records dashboard has:
| Record name | Type | Routing Policy | … | Alias | Value/Route traffic to | TTL |
|---|---|---|---|---|---|---|
| _acme-challenge.jhoangv.com | TXT | Simple | … | No | “QWuVPxp9w8YJZl2biYzY9-t4V_yBUShzvpqtvlIKgzs” | 300 |
After the configuration on Route53 done, back to the previous terminal and press Enter. The process will continue and you will get the result like:
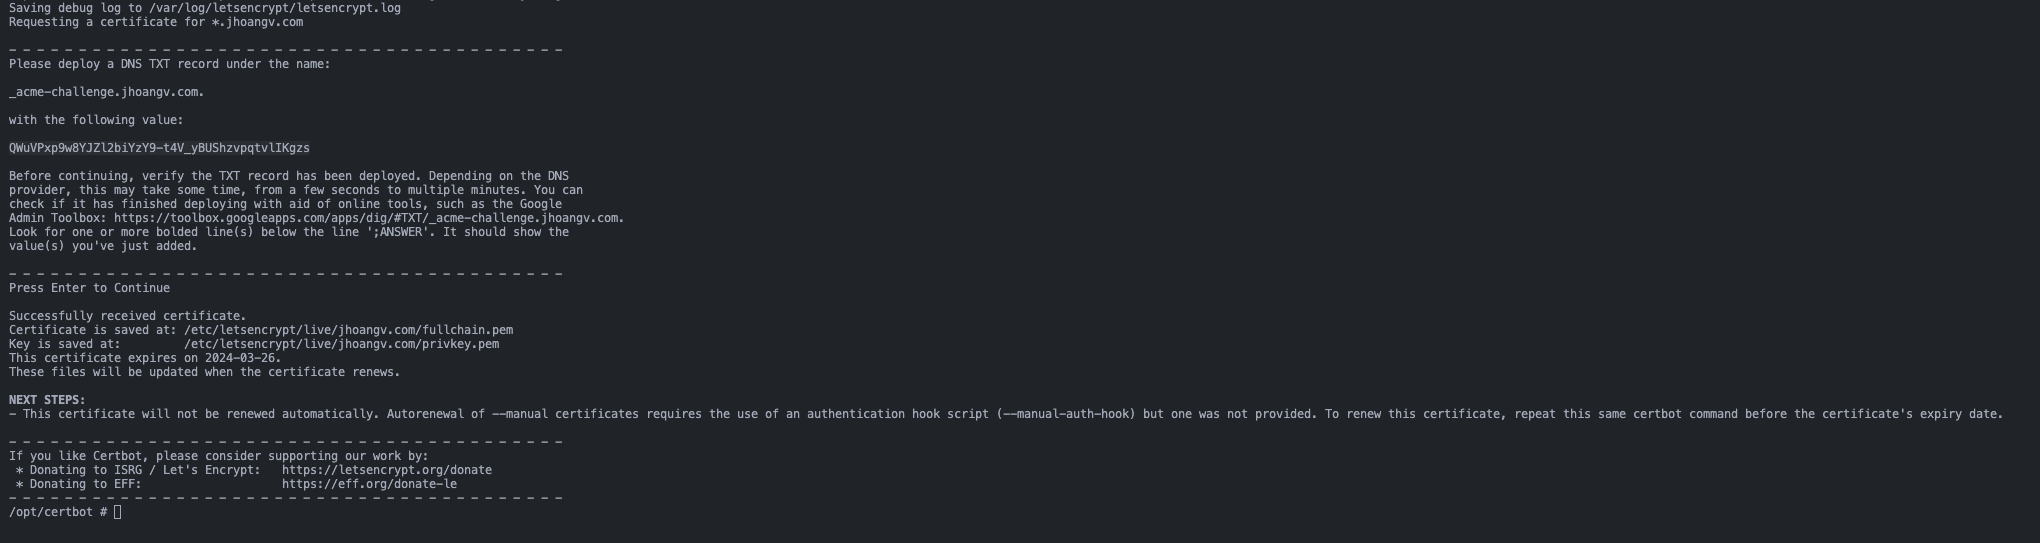 Request Challange Result
If you get the timeout error, dont worry. You just need to rerun the request challange to continue the process
Now, the Let’s Encrypt wildcard certificates was created. In the docker-compose.yml, I have set the the volumes so the certificates are availabled at ./data/certbot/conf. Let’s setup the nginx and you the new certificates
Add Nginx into docker-compose
Let’s finish the docker-compose.yml by adding the nginx service:
1
2
3
4
5
6
7
8
9
10
11
12
13
14
15
16
17
18
19
20
21
22
23
24
25
version: '3'

services:
  nginx:
    container_name: nginx
    image: nginx:1.21.3-alpine
    restart: unless-stopped
    volumes:
      - ./nginx/conf.d/:/etc/nginx/conf.d/
      - /etc/letsencrypt:/etc/letsencrypt
      - /var/www/certbot:/var/www/certbot
    ports:
      - "80:80"
      - "443:443"
    command: /bin/sh -c "while :; do sleep 6h & wait $${!}; nginx -s reload; done & nginx -g 'daemon off;'"

  certbot:
    container_name: certbot
    image: certbot/certbot
    restart: unless-stopped
    volumes:
      - ./data/certbot/conf:/etc/letsencrypt
      - ./data/certbot/www:/var/www/certbot
    entrypoint: "/bin/sh -c 'trap exit TERM; while :; do certbot renew; sleep 12h & wait $${!}; done;'"
Save this file as nginx/app.conf alongside docker-compose.yml.
1
2
3
4
5
6
7
8
9
10
11
12
13
14
15
16
17
18
19
20
21
server {
    listen 80;
    server_name example.jhoangv.com;
    location / {
        return 301 https://$host$request_uri;
    }
}
server {
    listen 443 ssl;
    server_name example.jhoangv.com;
    resolver 127.0.0.11 valid=5s;

    ssl_certificate /etc/letsencrypt/live/jhoangv.com/fullchain.pem;
    ssl_certificate_key /etc/letsencrypt/live/jhoangv.com/privkey.pem;
    include /etc/letsencrypt/options-ssl-nginx.conf;
    ssl_dhparam /etc/letsencrypt/ssl-dhparams.pem;

    location / {
        proxy_pass http://example.jhoangv.com; #for demo purposes
    }
}
Automatic Certificate Renewal
Explain more detail about 2 commands in nginx and certbot service.
We need to make sure our certificate is renewed when it’s about to expire. The certbot image doesn’t do that automatically but we can change that!
1
entrypoint: "/bin/sh -c 'trap exit TERM; while :; do certbot renew; sleep 12h & wait $${!}; done;'"
This will check if your certificate is up for renewal every 12 hours as recommended by Let’s Encrypt.
In the nginx section, you need to make sure that nginx reloads the newly obtained certificates:
1
command: "/bin/sh -c 'while :; do sleep 6h & wait $${!}; nginx -s reload; done & nginx -g \"daemon off;\"'"
This makes nginx reload its configuration (and certificates) every six hours in the background and launches nginx in the foreground.
Docker-compose Me Up!
Everything is in place now. The initial certificates have been obtained and our containers are ready to launch. Simply run docker-compose up and enjoy your HTTPS-secured website or app.
References
Here are a couple other articles that were helpful in getting this setup: